

We sit at our desks for hours, and slight issues can create back and neck strain in the long run. You don't need to spend an arm and a leg to upgrade your workspace - just tackle three areas: a good chair that fits your body, an efficient desk space that puts everything easily at your fingertips, and deliberate placement of your computer and other technology. These little things will make you feel at ease and avoid the pains and aches associated with an ill-conceived workspace.

1. Choose and Adjusting Your Office Chair
Your chair is the cornerstone of your home office setup. The majority of individuals spend 6-8 hours seated when working, which means decent seating is central to preventing back pain and enhancing concentration. A quality chair does not have to be costly, but it must have certain adjustable features so it can properly support your body throughout the day.
Essential Chair Adjustments for Pain-Free Working
Set Your Chair Height to Match Your Body
Set the height of your chair so that your thighs are level with the ground and your feet are flat on the ground. This eases pressure on your lower back and improves circulation in your legs. If your desk is too high to do this comfortably, use a footrest under your feet rather than raising your chair to an uncomfortable height.
Position Lumbar Support to Prevent Back Pain
Your lower back will also have a natural inward curve that needs to be supported when sitting. A quality office chair will have an adjustable lumbar support that sits in the small of your back. Without it, most individuals slouch, which strains the spinal discs and the muscles around them. If your chair has no built-in support, use a small cushion or rolled up towel behind your lower back.
Adjust Seat Depth to Protect Your Legs
The seat pan should allow you to sit straight back in the chair with only a small gap (the 2-3 finger widths distance) between the front of the seat and the top of your thighs. This permits pressure to remain off the veins and nerves inside your legs. Sliding seat pans are something that many good-quality chairs can offer to accommodate different sizes of bodies.
Configure Armrests to Relieve Shoulder Strain
Properly adjusted armrests take the weight off your shoulders and neck. Position them so that your arms rest in a comfortable position with elbows bent at approximately 90 degrees. Your shoulders must remain relaxed and not dropped or hunched. If your armrests cannot be moved and interfere with your typing position, consider removing them completely.
Daily Posture Habits That Prevent Injuries
Even the best chair can't compensate for poor sitting habits. How you sit matters just as much as what you sit on.
Align Your Back to Reduce Spinal Pressure
A neutral spine position maintains the natural curves of your back without excessive arching or flattening. Sit with your weight distributed evenly on both sit bones, and keep your head balanced above your shoulders, not jutting forward. Your ears, shoulders, and hips should form a straight line when viewed from the side.
Correct Forward Head and Slouching Problems
Two habitual sitting positions cause most office-related pain: slouching (which strains your lower back) and the forward head posture (leaning toward your screen). Both positions place extra pressure on your spine and overtax your muscles. Whenever you catch yourself in these positions, reset your posture by sitting tall and pulling your shoulders gently back.
Schedule Movement Breaks Every 30 Minutes
No matter how perfect your setup, staying in one position too long leads to stiffness and discomfort. Set a timer to remind yourself to change positions every 30 minutes. Stand up, stretch your arms overhead, roll your shoulders, or take a short walk. These micro-breaks help reset your posture and give overtaxed muscles a chance to recover.

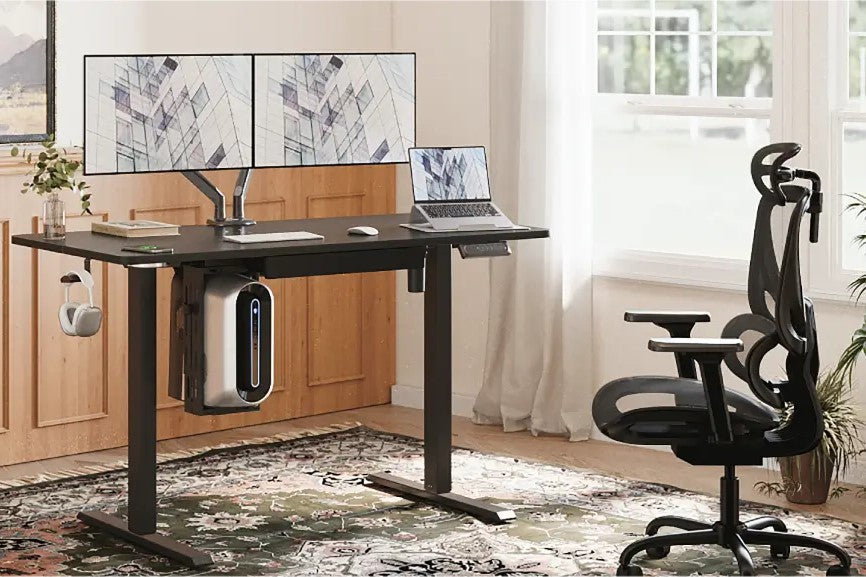
2. Set Up Your Desk and Equipment for Maximum Comfort
The way you arrange your work surface and tools directly affects how your body feels after hours of computer work. Even small adjustments to your desk height, keyboard position, and monitor placement can dramatically reduce strain on your neck, shoulders, and wrists.
Finding Your Ideal Desk Height
Match Desk Height to Your Elbow Position
Your desk should allow your elbows to rest at approximately 90 degrees when typing. This position keeps your shoulders relaxed and prevents wrist strain. If your desk is too high, raise your chair and add a footrest. If it's too low, place stable risers under the desk legs or use monitor stands to elevate your equipment.
Keep Your Shoulders Down and Back
When sitting at your desk, check that your shoulders remain in a neutral position—not raised toward your ears or hunched forward. Tension in the shoulders often leads to neck pain and headaches. If you notice yourself tensing up, take a moment to roll your shoulders back and down.
Add a Standing Desk to Reduce Sitting Time
Standing desks let you alternate between sitting and standing throughout the day. This variation reduces pressure on your spine and improves circulation. Start with short standing periods (15-20 minutes) and gradually increase as your body adapts. The ideal arrangement allows you to switch positions without disrupting your workflow.
Positioning Your Keyboard and Mouse
Center the Keyboard to Align With Your Body
Position your keyboard directly in front of you, aligned with the center of your body. The B key typically serves as the centerpoint. This alignment prevents you from twisting your torso or reaching to one side while typing, which can cause asymmetrical muscle strain.
Place Your Mouse Within Easy Reach
Keep your mouse right next to your keyboard at the same height. Reaching for a distant mouse forces your shoulder into an extended position and strains your arm. If desk space is limited, consider a compact keyboard without a number pad to create more room for comfortable mouse movement.
Try Split or Angled Keyboard Options
Ergonomic keyboards split or angle the keys to match your hands' natural position. These designs help keep your wrists straight rather than bent outward (ulnar deviation). Similarly, vertical mice position your hand in a "handshake" orientation that reduces forearm twisting. These specialized tools can help if you experience wrist or forearm discomfort.
Adjusting Your Monitor for Eye and Neck Health
Position the Screen Top at Eye Level
Set your monitor height so the top of the screen aligns with or sits slightly below your eye level when sitting with good posture. This position lets you view most of the screen with a slight downward gaze, which is the most comfortable position for your eyes and neck. For laptops, this typically requires an external monitor or laptop stand.
Set the Correct Viewing Distance
Place your monitor approximately an arm's length away (18-24 inches). This distance prevents eye strain from focusing too closely and reduces the need to lean forward to read text. If you find yourself squinting or leaning closer, increase text size rather than moving the screen.
Center the Screen to Keep Your Neck Straight
Position your primary monitor directly in front of you to avoid turning your head to one side. For dual monitors, place the screen you use most often directly ahead and the secondary display immediately beside it. If you use both screens equally, position yourself at the point where the monitors meet. This arrangement minimizes neck rotation and the associated strain.

3. Adapt Technology for Comfort and Efficiency
Technology forms the core of most home offices, but without proper setup, these tools can cause physical strain. Making a few targeted adjustments to your laptop setup, room lighting, and cable arrangement can significantly improve both comfort and productivity.
Transforming Your Laptop into an Ergonomic Workstation
Raise Your Laptop Screen to Prevent Neck Pain
Laptops force a compromise: either your screen is too low or your keyboard is too high. Solve this problem with a laptop stand that elevates your screen to eye level. Simple stands cost under $30, while adjustable models offer more flexibility. In a pinch, a stack of sturdy books works well. This elevation prevents the forward head posture that leads to "tech neck" pain.
Connect External Devices for Wrist Protection
Once your laptop screen is properly positioned, add an external keyboard and mouse placed at desk level. This setup keeps your arms and wrists in a neutral position while allowing your screen to remain at eye level. Wireless options reduce cable clutter, but even basic wired peripherals offer significant ergonomic benefits compared to using the built-in laptop keyboard and trackpad.
Creating Proper Lighting Conditions
Eliminate Screen Glare with Strategic Positioning
Position your desk perpendicular to windows rather than directly in front of or opposite them. This arrangement prevents harsh sunlight from hitting your screen and creating glare that causes squinting and eye strain. Use blinds or curtains during peak daylight hours if window positioning can't be changed. For artificial lighting, avoid placing bright lights directly behind your monitor.
Balance Room Lighting to Reduce Eye Fatigue
Your workspace should be evenly lit with ambient light that's neither too dim nor too bright compared to your screen. A task lamp with adjustable brightness provides targeted illumination for reading physical documents without creating screen reflections. Consider lights with adjustable color temperature—cooler light (5000K+) promotes alertness during the day, while warmer light (3000K) is less disruptive to sleep patterns for evening work.
Organizing Cables for Safety and Flexibility
Create a Tidy Workspace with Simple Cable Solutions
Tangled cables create both physical and mental clutter. Use simple cable management tools like cord clips, cable sleeves, or cable ties to bundle wires together along desk edges or legs. Label important cables with tape or cable tags for easy identification. Consider running cables along the underside of your desk using adhesive clips or a cable tray to keep them entirely off the floor.
Prevent Tripping Hazards with Strategic Placement
Arrange your workspace with cable length and outlet access in mind. Position your desk near power outlets to avoid stretching cords across walkways. For devices frequently moved around your workspace, leave some slack in the cable without creating a tangled excess. Invest in a single, high-quality surge protector with adequate cord length rather than connecting multiple extension cords, which creates both safety hazards and cable confusion.
Improve Your Ergonomic Workspace Now!
A good home office arrangement keeps you pain-free and protects your health with little effort. By positioning your chair to hold your spine, your desk to put your body into neutral postures, and your technology to reduce strain, you create a work area that works for you and doesn't hurt your body. These simple changes stop the daily pain that becomes long-term damage. The three pillars covered in this manual provide you with everything you require to work from home comfortably and securely.
Share:
The Best-Selling Monitor Arm from HUANUO
How to Improve Comfort with an Ergonomic Standing Desk